The
NamesAndTypes module gives images and/or channels a meaningful name to a particular image or channel, as well as defining the relationships between images to create an image set.
Once the relevant images have been identified using the
Images module (and/or has had metadata associated with the images using the
Metadata module), the
NamesAndTypes module gives each image a meaningful name by which modules in the analysis pipeline will refer to it.
What is an "image set"?
An
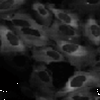
image set is the collection of channels that represent a single field of view. For example, a fluorescent assay may have samples using DAPI and GFP to label separate cellular sub-compartments (see figure below), and for each site imaged, one DAPI (left) and one GFP image (right) is acquired by the microscope. Sometimes, the two channels are combined into a single color images and other times they are stored as two separate grayscale images, as in the figure.
For the purposes of analysis, you want the DAPI and GFP image for a given site to be loaded and processed together. Therefore, the DAPI and GFP image for a given site comprise an image set for that site.
What do I need as input?
The
NamesAndTypes module receives the file list produced by the
Images module. If you used the
Metadata module to attach metadata to the images, this information is also received by
NamesAndTypes and available for its use.
What do the settings mean?
In the above example, the
NamesAndTypes module allows you to assign each of these channels a unique name, provided by you. All files of a given channel will be referred to by the chosen name within the pipeline, and the data exported by the pipeline will also be labeled according to this name. This simplifies the bookkeeping of your pipeline and results by making the input and output data more intuitive: a large number of images are referred to by a small collection of names, which are hopefully easier for you to recognize.
The most common way to perform this assignment is by specifying the pattern in the filename which the channel(s) of interest have in common. This is done using user-defined rules in a similar manner to that of the Images module; other attributes of the file may also be used. If you have multiple channels, you then assign the relationship between channels. For example, in the case mentioned above, the DAPI and GFP images are named in such a way that it is apparent to the researcher which is which, e.g., "_w1" is contained in the file for the DAPI images, and "_w1" in the file name for the GFP images.
You can also use NamesAndTypes to define the relationships between images. For example, if you have acquired multiple wavelengths for your assay, you will need to match the channels to each other for each field of view so that they are loaded and processed together. This can be done by using their associated metadata. If you would like to use the metadata-specific settings, please see the Metadata module or Help > General help > Using Metadata in CellProfiler for more details on metadata usage and syntax.
What do I get as output?
The
NamesAndTypes module is the last of the required input modules. After this module, you can choose any of the names you defined from a drop-down list in any downstream analysis module which requires an image as input. If you defined a set of objects using this module, those names are also available for analysis modules that require an object as input.
In order to see whether the images are matched up correctly to form the image sets you would expect, press the "Update" button below the divider to display a table of results using the current settings. Each row corresponds to a unique image set, and the columns correspond to the name you specified for CellProfiler to identify the channel. You can press this button as many times as needed to display the most current image sets obtained. When you complete your pipeline and perform an analysis run, CellProfiler will process the image sets in the order shown.
Available measurements
- FileName, PathName: The prefixes of the filename and location, respectively, of each image set written to the per-image table.
- ObjectFileName, ObjectPathName: (For used for images loaded as objects) The prefixes of the filename and location, respectively, of each object set written to the per-image table.
Settings:
Assign a name to
This setting allows the user to specify a name to images or subsets
of images so they can be treated separately by downstream modules.
For example, giving a different name to a GFP stain image and a
brightfield image of the same site allows each to be processed
independently.
There are three choices:
- All images: Give every image the same name.
This is the simplest choice and the appropriate one if you have
only one kind of image (or only one image). CellProfiler will
give each image the same name and the pipeline will load only
one of the images per iteration.
- Images matching rules: Give images one of several names
depending on the file name, directory and metadata. This is the
appropriate choice if more than one image was acquired from each
imaging site. You will be asked for distinctive criteria for
each image and will be able to assign each category of image
a name that can be referred to in downstream modules.
Image set matching method
Select how you want to match the image from one channel with
the images from other channels.
This setting controls how CellProfiler picks which images
should be matched together when analyzing all of the images
from one site.
You can match corresponding channels to each other in one of two ways:
- Order: CellProfiler will order the images in
each channel alphabetically by their file path name and, for movies
or TIF stacks, will order the frames by their order in the file.
CellProfiler will then match the first from one channel to the
first from another channel.
This approach is sufficient for most applications, but
will match the wrong images if any of the files are missing or misnamed.
The image set list will then get truncated according to the channel with
the fewer number of files.
- Metadata: CellProfiler will match files with
the same metadata values. This option is more complex to use than
Order but is more flexible and less prone to inadvertent
errors. Please see the Metadata module for more details on metadata collection and usage.
As an example, an experiment is run on a single multiwell plate with two
image channels (OrigBlue, w1 and OrigGreen, w2) containing
well and site metadata extracted using the Metadata module. A set of
images from two sites in well A01 might be described using the following:
| File name | Well | Site | Wavelength |
|---|
| P-12345_A01_s1_w1.tif | A01 | s1 | w1 |
| P-12345_A01_s1_w2.tif | A01 | s1 | w2 |
| P-12345_A01_s2_w1.tif | A01 | s2 | w1 |
| P-12345_A01_s2_w2.tif | A01 | s2 | w2 |
We want to match the channels so that each field of view in uniquely represented by the two channels. In this case,
to match the w1 and w2 channels with their respective well and site metadata,
you would select the Well metadata for both channels, followed by the Site metadata
for both channels. In other words:
| OrigBlue | OrigGreen |
|---|
| Well | Well |
| Site | Site |
In this way, CellProfiler will match up files that have the same
well and site metadata combination, so that the w1 channel belonging to well A01 and site 1
will be paired with the w2 channel belonging to well A01 and site 1. This will occur for all
unique well and site pairings, to create an image set similar to the following:
| Image set tags | Channels |
|---|
| Well | Site | OrigBlue (w1) | OrigGreen (w2) |
| A01 | s1 | P-12345_A01_s1_w1.tif | P-12345_A01_s1_w2.tif |
| A01 | s2 | P-12345_A01_s2_w1.tif | P-12345_A01_s2_w2.tif |
Image sets for which a given metadata value combination (e.g., well, site) is either
missing or duplicated for a given channel will simply be omitted.
In addition, CellProfiler can match a single file for one channel against many files from
another channel. This is useful, for instance, for applying an illumination correction file
for an entire plate against every image file for that plate. In this instance, this would be
done by selecting Plate as the common metadata tag and (None) for the rest:
| OrigBlue | IllumBlue |
|---|
| Plate | Plate |
| Well | (None) |
| Site | (None) |
There are two special cases in metadata handling worth mentioning:
- Missing metadata: For a particular metadata tag, one image from a given
image set has metadata values defined but another image does not. An example is when a microscope
aborts acquisition prematurely in the middle of scanning two channels for a site, and captures
one channel but not the other. In this case, plate, well and site metadata value exists for one
image but not for the other since it was never acquired.
- Duplicate metadata: For a particular metadata tag, the same metadata values exist
for multiple image sets such that they are not uniquely defined. An example is when a microscope
re-scans a site in order to recover from a prior error. In this case, there may be one image from
one channel but two images for the other channel, for the same site. Therefore, multiple instances
of the same plate, well and site metadata values exist for the same image set.
In both of these cases, the exact pairing between channels no longer exists. For missing metadata, the pairing is one-to-none,
and for duplicate metadata, the pairing is one-to-two. In these instances where a match cannot be
made, NamesAndTypes will simply omit the confounding metadata values from consideration. In the above
example, an image set will not be created for the plate, well and site combination in question.
Set intensity range from
This option determines how the image intensity should be
rescaled from 0.0 – 1.0.
- Image metadata: Rescale the image
intensity so that saturated values are rescaled to 1.0 by dividing
all pixels in the image by the maximum possible intensity value
allowed by the imaging hardware. Some image formats save the maximum
possible intensity value along with the pixel data.
For instance, a microscope might acquire images using a 12-bit
A/D converter which outputs intensity values between zero and 4095,
but stores the values in a field that can take values up to 65535.
Choosing this setting ensures that the intensity scaling value is
the maximum allowed by the hardware, and not the maximum allowable
by the file format.
- Image bit-depth: Ignore the image
metadata and rescale the image to 0 – 1 by dividing by 255
or 65535, depending on the number of bits used to store the image.
Please note that CellProfiler does not provide the option of loading
the image as the raw, unscaled values. If you wish to make measurements
on the unscaled image, use the
ImageMath module to multiply the
scaled image by the actual image bit-depth.
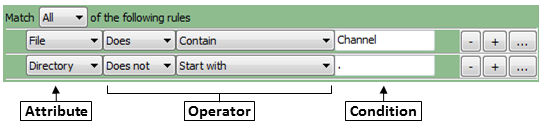
Select the rule criteria
Specify a filter using rules to narrow down the files to be analyzed.
Clicking the rule menus shows you all the file attributes, operators and conditions you can specify to narrow down
the image list.
- For each rule, first select the attribute that the rule is to be based on. For example, you can select "File"
to define a rule that will filter files on the basis of their filename.
- The operator drop-down is then updated with operators applicable to the attribute you selected. For example, if you select
"File" as the attribute, the operator
menu includes text operators such as Contain or Starts with. On the other hand, if you
select "Extension" as the attribute, you can choose the logical operators "Is" or "Is not" from the menu.
- In the operator drop-down menu, select the operator you want to use. For example,
if you want to match data exactly, you may want the "Exactly match" or the "Is" operator. If you want the
condition to be more loose, select an operator such as "Contains".
- Use the condition box to type the condition you want to match. The more
you type, the more specific the condition is.
- As an example, if you create a new filter and select
File as the attribute, then select "Does" and "Contain" as the operators, and type "Channel" as the condition,
the filter finds all files that include the text "Channel", such as "Channel1.tif" "Channel2.jpg", "1-Channel-A01.BMP" and so on.
- If you select "Does" and "Start with" as the operators and "Channel1" in the Condition box,
the rule will includes such files as "Channel1.tif" "Channel1-A01.png", and so on.
You can also create regular expressions (an advanced syntax for pattern matching; see below) in order to select particular files.
To add another rule, click the plus buttons to the right of each rule. Subtract an existing rule by clicking the
minus button.
You can also link a set of rules by choosing the logical expression All or Any. If you use
All logical expression, all the rules be true for a file to be included in the File list. If
you use the Any option, only one of the conditions has to be met for a file to be included.
If you want to create more complex rules (e.g, some criteria matching all rules and others matching any),
you can create sets of rules, by clicking the ellipsis button (to the right of the plus button).
Repeat the above steps to add more rules to the filter until you have
all the conditions you want to include.
Details on regular expressions
A regular expression is a general term refering to a method of searching for pattern matches in text. There is a high
learning curve to using them, but are quite powerful once you understand the basics.
Patterns are specified using
combinations of metacharacters and literal characters. There are a few
classes of metacharacters, partially listed below. Some helpful links follow:
- A more extensive explanation of regular expressions can be found
here
- A helpful quick reference can be found here
- Pythex provides quick way to test your regular expressions. Here is an
example
to capture information from a common microscope nomenclature.
The following metacharacters match exactly one character from its respective set of characters:
| Metacharacter | Meaning |
|---|
| . | Any character |
| [] | Any character contained within the brackets |
| [^] | Any character not contained within the brackets |
| \w | A word character [a-z_A-Z0-9] |
| \W | Not a word character [^a-z_A-Z0-9] |
| \d | A digit [0-9] |
| \D | Not a digit [^0-9] |
| \s | Whitespace [ \t\r\n\f\v] |
| \S | Not whitespace [^ \t\r\n\f\v] |
The following metacharacters are used to logically group subexpressions
or to specify context for a position in the match. These metacharacters
do not match any characters in the string:
| Metacharacter | Meaning |
|---|
| ( ) | Group subexpression |
| | | Match subexpression before or after the | |
| ^ | Match expression at the start of string |
| $ | Match expression at the end of string |
| \< | Match expression at the start of a word |
| \> | Match expression at the end of a word |
The following metacharacters specify the number of times the previous
metacharacter or grouped subexpression may be matched:
| Metacharacter | Meaning |
|---|
| * | Match zero or more occurrences |
| + | Match one or more occurrences |
| ? | Match zero or one occurrence |
| {n,m} | Match between n and m occurrences |
Characters that are not special metacharacters are all treated literally
in a match. To match a character that is a special metacharacter, escape
that character with a '\'. For example '.' matches any character, so to
match a '.' specifically, use '\.' in your pattern.
Examples:
[trm]ail matches 'tail' or 'rail' or 'mail'.[0-9] matches any digit between 0 to 9.[^Q-S] matches any character other than 'Q' or 'R' or 'S'.[[]A-Z] matches any upper case alphabet along with square brackets.[ag-i-9] matches characters 'a' or 'g' or 'h' or 'i' or '-' or '9'.[a-p]* matches '' or 'a' or 'aab' or 'p' etc.[a-p]+ matches 'a' or 'abc' or 'p' etc.[^0-9] matches any string that is not a number.^[0-9]*$ matches either a blank string or a natural number.^-[0-9]+$|^\+?[0-9]+$ matches any integer.
Name to assign these images
Enter the name that you want to call this image.
After this point, this image will be referred to by this
name, and can be selected from any drop-down menu that
requests an image selection.
Name to assign these objects
Enter the name that you want to call this set of objects.
After this point, this object will be referred to by this
name, and can be selected from any drop-down menu that
requests an object selection.
Select the image type
You can specify how these images should be treated:
- Grayscale image: An image in which each pixel
represents a single intensity value. Most of the modules in CellProfiler
operate on images of this type.
If this option is applied to a color image, the red, green and blue
pixel intensities will be averaged to produce a single intensity value.
- Color image: An image in which each pixel
repesents a red, green and blue (RGB) triplet of intensity values.
Please note that the object detection modules such as IdentifyPrimaryObjects
expect a grayscale image, so if you want to identify objects, you
should use the ColorToGray module in the analysis pipeline
to split the color image into its component channels.
You can use the Grayscale image option to collapse the
color channels to a single grayscale value if you don't need CellProfiler
to treat the image as color.
- Binary mask: A mask is an image where some of the
pixel intensity values are zero, and others are non-zero. The most common
use for a mask is to exclude particular image regions from consideration. By
applying a mask to another image, the portion of the image that overlaps with
the non-zero regions of the mask are included. Those that overlap with the
zeroed region are "hidden" and not included in downstream calculations.
For this option, the input image should be a binary image, i.e, foreground is
white, background is black. The module will convert any nonzero values
to 1, if needed. You can use this option to load a foreground/background
segmentation produced by one of the Identify modules.
- Illumination function: An illumination correction function
is an image which has been generated for the purpose of correcting uneven
illumination/lighting/shading or to reduce uneven background in images. Typically,
is a file in the MATLAB .mat format. See CorrectIlluminationCalculate and
CorrectIlluminationApply for more details.
- Objects: Use this option if the input image
is a label matrix and you want to obtain the objects that it defines.
A label matrix is a grayscale or color image in which the connected
regions share the same label, which defines how objects are represented
in CellProfiler. The labels are integer values greater than or equal
to 0. The elements equal to 0 are the background, whereas the elements
equal to 1 make up one object, the elements equal to 2 make up a second
object, and so on. This option allows you to use the objects
immediately without needing to insert an Identify module to
extract them first. See IdentifyPrimaryObjects for more details.
This option can load objects created by the SaveImages module. These objects
can take two forms, with different considerations for each:
- Non-overalapping objects are stored as a label matrix. This matrix should be
saved as grayscale, rather than color.
- Overlapping objects are stored in a multi-frame TIF, each frame of whichc consists of a
grayscale label matrix. The frames are constructed so that objects that overlap are placed
in different frames.
Retain outlines of loaded objects?
Select Yes to retain the outlines of the new objects
for later use in the pipeline. For example, a common use is for quality control purposes by
overlaying them on your image of choice using the OverlayOutlines module and then saving
the overlay image with the SaveImages module.
Name the outline image
(Used only if the outline image is to be retained for later use in the pipeline)
Enter a name for the outlines of the identified
objects. The outlined image can be selected in downstream modules by selecting
them from any drop-down image list.