The
Metadata module connects information about the images (i.e., metadata) to your list of images for processing in CellProfiler.
The
Metadata module allows you to extract and associate metadata with your images. The metadata can be extracted from the image file itself, from a part of the file name or location, and/or from a text file you provide.
What is "metadata"?
The term
metadata refers to "data about data." For many assays, metadata is important in the context of tagging images with various attributes, which can include (but is not limited to) items such as the following:
- The row and column of the microtiter plate that the image was acquired from.
- The experimental treatment applied to the well that the image was acquired from.
- The number of timepoints or channels contained in the image file.
- The image type, i.e., RGB, indexed or separate channels.
- The height and width of an image, in pixels.
- Etc.
It can be helpful to inform CellProfiler about certain metadata in order to define a specific relationship between the images and the associated metadata. For instance:
- You want images with a common tag to be matched together so they are processed together during the pipeline run. E.g., the filenames for fluorescent DAPI and GFP images contain different tags indicating the wavelength but share '_s1' in the filename if they were acquired from site #1, '_s2' from site #2, and so on.
- You want certain information attached to the output measurements and filenames for annotation or sample-tracking purposes. E.g., some images are to be identified as acquired from DMSO treated wells, whereas others were collected from wells treated with Compound 1, 2,... and so forth.
The underlying assumption in matching metadata values to image sets is that there is an exact pairing (i.e., a one-to-one match) for a given combination of metadata tags. A common example is that for a two-channel microtiter plate assay, the values of the plate, well, and site tags from one channel get matched uniquely to the plate, well, and site tag values from the other channel.
What are the inputs?
If you do not have metadata that is relevant to your analysis, you can leave this module in the default setting, and continue on to the
NamesAndTypesmodule If you do have relevant metadata, the
Metadata module receives the file list produced by the
Images module. It then associates information to each file in the File list, which can be obtained from several sources:
- From the image file name or location (e.g., as assigned by a microscope). In this case, you will provide the text search pattern to obtain this information.
- In a text file created and filled out by you or a laboratory information management system. In this case, you will point the module to the location of this file.
- In the image file itself.
What do the settings mean?
See below for help on the individual settings. In general, the settings serve in various forms of metadata extraction. You can extract metadata from all images from
Images modules or a subset of them by using rules to filter the list.
What do I get as output?
The final product of the
Metadata module is a list of files from the
Imagesmodule, accompanied by the associated metadata retrieved from the source(s) provided and matched to the desired images.
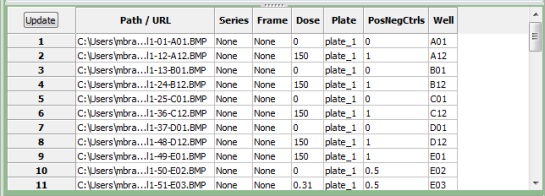
As you are extracting metadata from your various sources, you can click the "Update" button below the divider to display a table of results using the current settings. Each row corresponds to an image file from the Images module, and the columns display the metadata obtained for each tag specified. You can press this button as many times as needed to display the most current metadata obtained.
Some downstream use cases for metadata include the following:
- If the metadata establishes how channels are related to one another, you can use them in the NamesAndTypes module to aid in creating an image set.
- If the images need to be further sub-divided into groups of images that share a common metadata value, the Groups module can be used to specify which metadata is needed for this purpose.
- You can also use metadata to reference their values in later modules. Since the metadata is stored as an image measurement and can be assigned as an integer or floating-point number, any module which allows measurements as input can make use of it.
- Several modules are also capable of using metadata for more specific purposes. Refer to the module setting help for additional information on how to use them in the context of the specific module.
If the metadata originates from an external source such as a CSV, there are some caveats in the cases when metadata is either missing or duplicated for the referenced images; see the
NamesAndTypes module for more details.
Available measurements
- Metadata: The prefix of each metadata tag in the per-image table.
Settings:
Extract metadata?
Select Yes if your file or path names or file headers contain information
(i.e., metadata) you would like to extract and store along with your
measurements. See the main module
help for more details.
Metadata data type
Metadata can be stored as either a text or numeric value:
- Text: Save all metadata item as text.
- Choose for each: Choose the data type separately for each
metadata entry. An example of when this approach would be necessary
would be if a whole filename is captured as metadata but the file name is
numeric, e.g., "0001101". In this situation, if the file name needs to be used for an
arithmetic calculation or index, the name would need to be converted to a
number and you would select "Integer" as the data type.
On the other hand, if it important that the leading zeroes be retained,
setting it to an integer would them upon conversion to a number. In this case,
storing the metadata values as "Text" would be more appropriate.
Metadata types
(Used only when Choose for each is selected for the metadata data type)
This setting determines the data type of each metadata field
when stored as a measurement.
- Text: Save the metadata as text.
- Integer: Save the metadata as an integer.
- Float: Save the metadata as a decimal number.
- None: Do not save the metadata as a measurement.
Metadata extraction method
Metadata can be stored in either or both of two ways:
- Internally: This method is often through the file naming, directory structuring,
or the file header information.
- Externally: This is through an external index, such as spreadsheet or
database of some kind.
The
Metadata module can extract internal or external metadata from the images
in any of three ways:
- Extract from file/folder names: This approach retrieves information based on the file
nomenclature and/or location. A special syntax called "regular expressions" is used to match
text patterns in the file name or path, and then assign this text as metadata for the images
you specify. The tag for each metadata is assigned a name that is meaningful to you.
 When would you want to use this option? If you want to take advantage of the fact that
acquisition software often automatically assigns a regular nomenclature to the filenames or
the containing folders. Alternately, the researcher acquiring the images may also have a
specific nomenclature they adhere to for bookkeeping purposes.
When would you want to use this option? If you want to take advantage of the fact that
acquisition software often automatically assigns a regular nomenclature to the filenames or
the containing folders. Alternately, the researcher acquiring the images may also have a
specific nomenclature they adhere to for bookkeeping purposes.
- Import from file: This option retrieves metadata from a comma-delimited
file (known as a CSV file, for comma-separated values) of information; you will be prompted
to specify the location of the CSV file. You can create such a file using a spreadsheet program
such as Microsoft Excel.
-
When would you want to use this option? You have information curated in software that allows for
export to a spreadsheet. This is commonly the case for laboratories that use data management systems
that track samples and acquisition.
- Extract from image file headers: This option retrieves information from the internal
structure of the file format itself. Typically, image metadata is embedded in the image file
as header information; this information includes the dimensions and color depth among other
things. If you select this method, press the "Update metadata" button to extract the metadata.
Note that this extraction process can take a while for assays with lots of images since each
one needs to read for extraction. Since the metadata is often image-format specific, this option
will extract information that is common to most image types:
- Series: The series index of the image. This value is set to "None" if not applicable.
Some image formats can store more than one stack in a single file; for those, the Series
value for each stack in the file will be different
- Frame: The frame index of the image. This value is set to "None" if not applicable.
For stack frames and movies, this is the frame number for an individual 2-D image slice.
- ColorFormat: Set to "Monochrome" for grayscale images, "RGB" for color.
- SizeZ: The number of image slices. Typically has a value > 1 for confocal stacks
and the like.
- SizeT: The number of image frames. Typically has a value > 1 for movies.
- SizeC: The number of color channels. Typically has a value > 1 for non-grayscale
images and for confocal stacks containing channel images acquired using different filters and
illumination sources.
-
When would you want to use this option? You want to analyze images that are contained as
file stacks, i.e., the images that are related to each other in some way, such as by time
(temporal), space (spatial), or color (spectral).
Specifics on the metadata extraction options are described below. Any or all of these options
may be used at time; press the "Add another extraction method" button to add more.
Metadata source
You can extract the metadata from the image's file
name or from its folder name.
Regular expression
(Used only if you want to extract
metadata from the file name)
The regular expression to extract the metadata from the file name
is entered here. Note that this field is available whether you have
selected Text-Regular expressions to load the files or not.
Please see the general module help for more information on
construction of a regular expression.
Clicking the magnifying glass icon to the right will bring up a
tool for checking the accuracy of your regular expression. The
regular expression syntax can be used to name different parts of
your expression. The syntax (?P<fieldname>expr) will
extract whatever matches expr and assign it to the
measurement,fieldname for the image.
For instance, a researcher uses plate names composed of a string
of letters and numbers, followed by an underscore, then the well,
followed by another underscore, followed by an "s" and a digit
representing the site taken within the well (e.g., TE12345_A05_s1.tif).
The following regular expression will capture the plate, well, and
site in the fields "Plate", "Well", and "Site":
| ^(?P<Plate>.*)_(?P<Well>[A-P][0-9]{1,2})_s(?P<Site>[0-9]) |
| ^ | Start only at beginning of the file name |
| (?P<Plate> | Name the captured field Plate |
| .* | Capture as many characters as follow |
| _ | Discard the underbar separating plate from well |
| (?P<Well> | Name the captured field Well |
| [A-P] | Capture exactly one letter between A and P |
| [0-9]{1,2} | Capture one or two digits that follow |
| _s | Discard the underbar followed by s separating well from site |
| (?P<Site> | Name the captured field Site |
| [0-9] | Capture one digit following |
The regular expression can be typed in the upper text box, with
a sample file name given in the lower text box. Provided the syntax
is correct, the corresponding fields will be highlighted in the same
color in the two boxes. Press Submit to enter the typed
regular expression.
You can create metadata tags for any portion of the filename or path, but if you are
specifying metadata for multiple images, an image cycle can
only have one set of values for each metadata tag. This means that you can only
specify the metadata tags which have the same value across all images listed in the module. For example,
in the example above, you might load two wavelengths of data, one named TE12345_A05_s1_w1.tif
and the other TE12345_A05_s1_w2.tif, where the number following the w is the wavelength.
In this case, a "Wavelength" tag should not be included in the regular expression
because while the "Plate", "Well" and "Site" metadata is identical for both images, the wavelength metadata is not.
Note that if you use the special fieldnames <WellColumn> and
<WellRow> together, LoadImages will automatically create a <Well>
metadata field by joining the two fieldname values together. For example,
if <WellRow> is "A" and <WellColumn> is "01", a field
<Well> will be "A01". This is useful if your well row and column names are
separated from each other in the filename, but you want to retain the standard
well nomenclature.
Regular expression
(Used only if you want to extract metadata from the path)
Enter the regular expression for extracting the metadata from the
path. Note that this field is available whether you have selected
Text-Regular expressions to load the files or not.
Clicking the magnifying glass icon to the right will bring up a
tool that will allow you to check the accuracy of your regular
expression. The regular expression syntax can be used to
name different parts of your expression. The syntax
(?<fieldname>expr) will extract whatever matches
expr and assign it to the image's fieldname measurement.
For instance, a researcher uses folder names with the date and
subfolders containing the images with the run ID
(e.g., ./2009_10_02/1234/) The following regular expression
will capture the plate, well, and site in the fields
Date and Run:
| .*[\\/](?P<Date>.*)[\\/](?P<Run>.*)$ |
| .*[\\/] | Skip characters at the beginning of the pathname until either a slash (/) or
backslash (\) is encountered (depending on the operating system) |
| (?P<Date> | Name the captured field Date |
| .* | Capture as many characters that follow |
| [\\/] | Discard the slash/backslash character |
| (?P<Run> | Name the captured field Run |
| .* | Capture as many characters as follow |
| $ | The Run field must be at the end of the path string, i.e., the
last folder on the path. This also means that the Date field contains the parent
folder of the Date folder. |
Extract metadata from
Select whether you want to extract metadata from all of the images
chosen by the
Images module or a subset of the images.
This setting controls how different image types (e.g., an image
of the GFP stain and a brightfield image) have different metadata
extracted. There are two choices:
- All images: Extract metadata from all images specified in
Images. This is the simplest choice and the appropriate one if you have
only one kind of image (or only one image). CellProfiler will
extract metadata from all images using the same method per iteration.
- Images matching a rule: Extract metadata depending on specific file
attributes. This is the appropriate choice if more than one image was taken of each
imaging site. You can specify distinctive criteria for each image subset with
matching metadata.
Select the filtering criteria
Select
Yes to display and use rules to select files for metadata extraction.
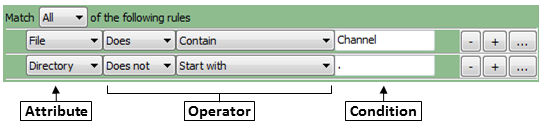
Clicking the rule menus shows you all the file attributes, operators and conditions you can specify to narrow down
the image list.
- For each rule, first select the attribute that the rule is to be based on. For example, you can select "File"
to define a rule that will filter files on the basis of their filename.
- The operator drop-down is then updated with operators applicable to the attribute you selected. For example, if you select
"File" as the attribute, the operator
menu includes text operators such as Contain or Starts with. On the other hand, if you
select "Extension" as the attribute, you can choose the logical operators "Is" or "Is not" from the menu.
- In the operator drop-down menu, select the operator you want to use. For example,
if you want to match data exactly, you may want the "Exactly match" or the "Is" operator. If you want the
condition to be more loose, select an operator such as "Contains".
- Use the condition box to type the condition you want to match. The more
you type, the more specific the condition is.
- As an example, if you create a new filter and select
File as the attribute, then select "Does" and "Contain" as the operators, and type "Channel" as the condition,
the filter finds all files that include the text "Channel", such as "Channel1.tif" "Channel2.jpg", "1-Channel-A01.BMP" and so on.
- If you select "Does" and "Start with" as the operators and "Channel1" in the Condition box,
the rule will includes such files as "Channel1.tif" "Channel1-A01.png", and so on.
You can also create regular expressions (an advanced syntax for pattern matching; see below) in order to select particular files.
To add another rule, click the plus buttons to the right of each rule. Subtract an existing rule by clicking the
minus button.
You can also link a set of rules by choosing the logical expression All or Any. If you use
All logical expression, all the rules be true for a file to be included in the File list. If
you use the Any option, only one of the conditions has to be met for a file to be included.
If you want to create more complex rules (e.g, some criteria matching all rules and others matching any),
you can create sets of rules, by clicking the ellipsis button (to the right of the plus button).
Repeat the above steps to add more rules to the filter until you have
all the conditions you want to include.
Details on regular expressions
A regular expression is a general term refering to a method of searching for pattern matches in text. There is a high
learning curve to using them, but are quite powerful once you understand the basics.
Patterns are specified using
combinations of metacharacters and literal characters. There are a few
classes of metacharacters, partially listed below. Some helpful links follow:
- A more extensive explanation of regular expressions can be found
here
- A helpful quick reference can be found here
- Pythex provides quick way to test your regular expressions. Here is an
example
to capture information from a common microscope nomenclature.
The following metacharacters match exactly one character from its respective set of characters:
| Metacharacter | Meaning |
|---|
| . | Any character |
| [] | Any character contained within the brackets |
| [^] | Any character not contained within the brackets |
| \w | A word character [a-z_A-Z0-9] |
| \W | Not a word character [^a-z_A-Z0-9] |
| \d | A digit [0-9] |
| \D | Not a digit [^0-9] |
| \s | Whitespace [ \t\r\n\f\v] |
| \S | Not whitespace [^ \t\r\n\f\v] |
The following metacharacters are used to logically group subexpressions
or to specify context for a position in the match. These metacharacters
do not match any characters in the string:
| Metacharacter | Meaning |
|---|
| ( ) | Group subexpression |
| | | Match subexpression before or after the | |
| ^ | Match expression at the start of string |
| $ | Match expression at the end of string |
| \< | Match expression at the start of a word |
| \> | Match expression at the end of a word |
The following metacharacters specify the number of times the previous
metacharacter or grouped subexpression may be matched:
| Metacharacter | Meaning |
|---|
| * | Match zero or more occurrences |
| + | Match one or more occurrences |
| ? | Match zero or one occurrence |
| {n,m} | Match between n and m occurrences |
Characters that are not special metacharacters are all treated literally
in a match. To match a character that is a special metacharacter, escape
that character with a '\'. For example '.' matches any character, so to
match a '.' specifically, use '\.' in your pattern.
Examples:
[trm]ail matches 'tail' or 'rail' or 'mail'.[0-9] matches any digit between 0 to 9.[^Q-S] matches any character other than 'Q' or 'R' or 'S'.[[]A-Z] matches any upper case alphabet along with square brackets.[ag-i-9] matches characters 'a' or 'g' or 'h' or 'i' or '-' or '9'.[a-p]* matches '' or 'a' or 'aab' or 'p' etc.[a-p]+ matches 'a' or 'abc' or 'p' etc.[^0-9] matches any string that is not a number.^[0-9]*$ matches either a blank string or a natural number.^-[0-9]+$|^\+?[0-9]+$ matches any integer.
Metadata file location
The file containing the metadata must be a comma-delimited file (CSV). You can create or edit
such a file using a spreadsheet program such as Microsoft Excel.
The CSV file needs to conform to the following format:
- Each column describes one type of metadata.
- Each row describes the metadata for one image site.
- The column headers are uniquely named. You can optionally prepend "Metadata_" to the header
name in order to insure that it is interpreted correctly.
- The CSV must be plain text, i.e., without hidden file encoding information. If using Excel
on a Mac to edit the file, choose to save the file as "Windows CSV" or "Windows Comma Separated".
The file must be saved as plain text, i.e., without hidden file encoding information.
If using Excel on a Mac to edit the file, choose to save the file as "Windows CSV" or "Windows
Comma Separated".
Match file and image metadata
Match columns in your .csv file to image metadata items.
If you are using a CSV in conjunction with the filename/path metadata matching, you might want
to capture the metadata in common with both sources. For example, you might be extracting the
well tag from the image filename while your CSV contains treatment dosage information
paired with each well. Therefore, you would want to let CellProfiler know that the well tag
extracted from the image filename and the well tag noted in the CSV are in fact the
one and the same.
This setting controls how rows in your CSV file are matched to
different images. Set the drop-downs to pair the metadata tags of the images and the
CSV, such that each row contains the corresponding tags. This can be done for as many
metadata correspondences as you may have for each source; press
 to add more rows.
Use case insensitive matching?
This setting controls whether row matching takes the metadata case
into account when matching. If you note that your CSV metadata is not being
applied, your choice on this setting may be the culprit.
Select No so that metadata entries that only differ by case
(for instance, "A01" and "a01") will not match.
Select Yes to match metadata entries that only differ
by case.