The
Images module specifies the location of image files to be analyzed by your pipeline.
The
Images module allows you to specify the location of files to be analyzed by the pipeline; setting this module correctly is the first step in creating a new project in CellProfiler. These files can be located on your hard drive, on a networked computer elsewhere, or accessible with a URL. You can also provide rules to specify only those files that you want analyzed out of a larger collection (for example, from a folder containing both images for analysis and non-image files that should be disregarded).
What is a "digital image"?
A
digital image is a set of numbers arranged into a two-dimensional format of rows and columns; a pixel refers to the row/column location of a particular point in the image. Pixels in grayscale or monochrome (black/white) images contain a single intensity value, whereas in color images, each pixel contains a red, green, and blue (RGB) triplet of intensity values. Additionally, the term image can be used as short-hand for an image sequence, that is, an image collection such as a time-lapse series (2-D +
t), confocal Z-stacks (3-D), etc.
CellProfiler can read a wide variety of image formats by using a library called Bio-Formats; see here for the formats available. Some image formats are better than others for use in image analysis. Some are "lossy" (information is lost in the conversion to the format) like most JPG/JPEG files; others are "lossless" (no image information is lost). For image analysis purposes, a lossless format like TIF or PNG is recommended.
What do I need as input?
The most straightforward way to provide image files to the
Images module is to simply drag-and-drop them on the file list panel (the blank space indicated by the text "Drop files and folders here").
Using the file explorer tool of your choice (e.g., Explorer in Windows, Finder in Mac), you can drag-and-drop individual files and/or entire folders into this panel. You can also right-click in the File list panel to bring up a file selection window to browse for individual files; on the Mac, folders can be drag-and-dropped from this window and you can select multiple files using Ctrl-A (Windows) or Cmd-A (Mac).
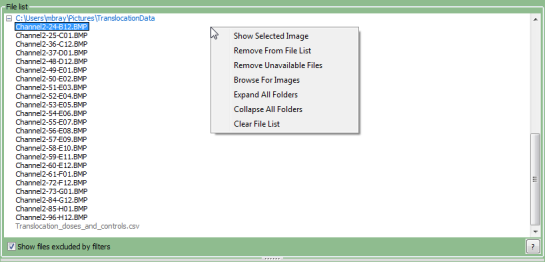
Right-clicking on the file list panel will provide a context menu with options to modify the file list:
- Show Selected Image: Selecting this option (or double-clicking on the file) will open the image in a new window.
- Remove From List: Removes the selected file or folder from the list. Note that this does not remove the file/folder from the hard drive.
- Remove Unavailable Files: Refresh the list by checking for existence of file. Note that this does not remove the file from the hard drive.
- Browse For Images: Use a dialog box to select an image file (though drag-and-drop is recommended).
- Refresh: Shown only if folder is selected. Refresh the list of files from the folder. Files that were manually removed from the list for that folder are restored.
- Expand All Folders: Expand all trees shown in the file list panel.
- Collapse All Folders: Collapse all folder trees shown in the file list panel.
- Clear File List: Remove all files/folders in the file list panel. You will be prompted for confirmation beforehand.
What do the settings mean?
If you have a subset of files that you want to analyze from the full listing shown in the panel, you can filter the files according to a set of rules. This is useful in cases such as:
- You have dragged a folder of images onto the file list panel, but the folder contains images you want to analyze along with non-image files that you want to disregard.
- You have dragged a folder of images onto the file list panel, but the folder contains the images from one experiment that you want to process along with images from another experiment that you want to ignore for now.
You may specify as many rules as necessary to define the desired list of images.
After you have filtered the file list, press the "Apply" button to update the view of the file list. You can also toggle the "Show file excluded by filters" box to modify the display of the files:
- Checking this box will show all the files in the list, with the files that have been filtered out shown as grayed-out entries.
- Not checking this box will only show the files in the list that pass the filter(s).
What do I get as output?
The final product of the
Images module is a file list in which any files that are not intended for further processing have been removed, whether manually or using filtering. This list will be used when collecting metadata (if desired) and when assembling the image sets in NamesAndTypes. The list can be filtered further in NamesAndTypes to specify, for example, that a subset of these images represents a particular wavelength.
Settings:
Filter images?
The
Images module will pass all the files specified in the file list
panel downstream to have a meaningful name assigned to it (so other modules can
access it) or optionally, to define the relationships between images and associated
metadata. Enabling file filtering will allow you to specify a subset of the files
from the file list panel by defining rules to filter the files. This approach is
useful if, for example, you drag-and-dropped a folder onto the file list panel
which contains a mixture of images that you want to analyze and other files that
you want to ignore.
Several options are available for this setting:
- No filtering: Do not enable filtering; all files in the File list
panel will be passed to downstream modules for processing. This option can be
selected if you are sure that only images are specified in the list.
- Images only: Only image files will be passed to downstream
modules. The permissible image formats are provided by a library called Bio-Formats; see
here for the formats available.
- Custom: Specify custom rules for selecting a subset of
the files from the File list panel. This approach is useful if, for example, you
drag-and-dropped a folder onto the File list panel which contains a mixture of images
that you want to analyze and other files that you want to ignore.
Select the rule criteria
Specify a set of rules to narrow down the files to be analyzed.
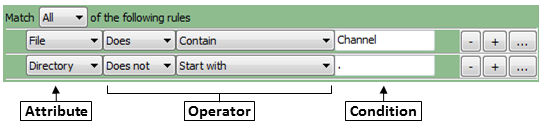
Clicking the rule menus shows you all the file attributes, operators and conditions you can specify to narrow down
the image list.
- For each rule, first select the attribute that the rule is to be based on. For example, you can select "File"
to define a rule that will filter files on the basis of their filename.
- The operator drop-down is then updated with operators applicable to the attribute you selected. For example, if you select
"File" as the attribute, the operator
menu includes text operators such as Contain or Starts with. On the other hand, if you
select "Extension" as the attribute, you can choose the logical operators "Is" or "Is not" from the menu.
- In the operator drop-down menu, select the operator you want to use. For example,
if you want to match data exactly, you may want the "Exactly match" or the "Is" operator. If you want the
condition to be more loose, select an operator such as "Contains".
- Use the condition box to type the condition you want to match. The more
you type, the more specific the condition is.
- As an example, if you create a new filter and select
File as the attribute, then select "Does" and "Contain" as the operators, and type "Channel" as the condition,
the filter finds all files that include the text "Channel", such as "Channel1.tif" "Channel2.jpg", "1-Channel-A01.BMP" and so on.
- If you select "Does" and "Start with" as the operators and "Channel1" in the Condition box,
the rule will includes such files as "Channel1.tif" "Channel1-A01.png", and so on.
You can also create regular expressions (an advanced syntax for pattern matching; see below) in order to select particular files.
To add another rule, click the plus buttons to the right of each rule. Subtract an existing rule by clicking the
minus button.
You can also link a set of rules by choosing the logical expression All or Any. If you use
All logical expression, all the rules be true for a file to be included in the File list. If
you use the Any option, only one of the conditions has to be met for a file to be included.
If you want to create more complex rules (e.g, some criteria matching all rules and others matching any),
you can create sets of rules, by clicking the ellipsis button (to the right of the plus button).
Repeat the above steps to add more rules to the filter until you have
all the conditions you want to include.
Details on regular expressions
A regular expression is a general term refering to a method of searching for pattern matches in text. There is a high
learning curve to using them, but are quite powerful once you understand the basics.
Patterns are specified using
combinations of metacharacters and literal characters. There are a few
classes of metacharacters, partially listed below. Some helpful links follow:
- A more extensive explanation of regular expressions can be found
here
- A helpful quick reference can be found here
- Pythex provides quick way to test your regular expressions. Here is an
example
to capture information from a common microscope nomenclature.
The following metacharacters match exactly one character from its respective set of characters:
| Metacharacter | Meaning |
|---|
| . | Any character |
| [] | Any character contained within the brackets |
| [^] | Any character not contained within the brackets |
| \w | A word character [a-z_A-Z0-9] |
| \W | Not a word character [^a-z_A-Z0-9] |
| \d | A digit [0-9] |
| \D | Not a digit [^0-9] |
| \s | Whitespace [ \t\r\n\f\v] |
| \S | Not whitespace [^ \t\r\n\f\v] |
The following metacharacters are used to logically group subexpressions
or to specify context for a position in the match. These metacharacters
do not match any characters in the string:
| Metacharacter | Meaning |
|---|
| ( ) | Group subexpression |
| | | Match subexpression before or after the | |
| ^ | Match expression at the start of string |
| $ | Match expression at the end of string |
| \< | Match expression at the start of a word |
| \> | Match expression at the end of a word |
The following metacharacters specify the number of times the previous
metacharacter or grouped subexpression may be matched:
| Metacharacter | Meaning |
|---|
| * | Match zero or more occurrences |
| + | Match one or more occurrences |
| ? | Match zero or one occurrence |
| {n,m} | Match between n and m occurrences |
Characters that are not special metacharacters are all treated literally
in a match. To match a character that is a special metacharacter, escape
that character with a '\'. For example '.' matches any character, so to
match a '.' specifically, use '\.' in your pattern.
Examples:
[trm]ail matches 'tail' or 'rail' or 'mail'.[0-9] matches any digit between 0 to 9.[^Q-S] matches any character other than 'Q' or 'R' or 'S'.[[]A-Z] matches any upper case alphabet along with square brackets.[ag-i-9] matches characters 'a' or 'g' or 'h' or 'i' or '-' or '9'.[a-p]* matches '' or 'a' or 'aab' or 'p' etc.[a-p]+ matches 'a' or 'abc' or 'p' etc.[^0-9] matches any string that is not a number.^[0-9]*$ matches either a blank string or a natural number.^-[0-9]+$|^\+?[0-9]+$ matches any integer.